
Get ready to make your nails festive this St. Patrick’s Day! As a nail art lover, I’m excited to share 20 st patricks day nails ideas. These designs will make your manicure pop during the green-tastic celebration. You’ll find everything from intricate Celtic designs to fun shamrock patterns.
These festive nails are perfect for anyone, whether you’re new to nail art or a pro. I’ve picked a variety of designs, from simple and elegant to bold and eye-catching. There’s something here for everyone to enjoy.
Key Takeaways
- Discover 20 unique St. Patrick’s Day nail art designs
- Learn techniques for creating festive nail looks
- Find inspiration for both simple and complex nail art
- Explore green and Irish-themed nail design options
- Get tips for expressing your holiday spirit through nail art
Getting Ready for St. Patrick’s Day: Essential Nail Art Supplies
Getting ready for St. Patrick’s Day nails needs some planning. Whether you’re new to nail art or experienced, the right tools are key. They help you create beautiful green nails that show off the Irish spirit.
Must-Have Green Nail Polish Shades
Choosing the right green polish is important for your Irish design. Spring nails are all about bright colors. St. Patrick’s Day is a great time to try different green shades.
- Emerald Green: A classic, rich shade that screams St. Patrick’s Day
- Mint Green: Perfect for a softer, more subtle spring look
- Olive Green: An unexpected neutral that works beautifully with metallic accents
- Sage Green: A trendy, muted tone that suits multiple skin tones
Basic Tools for Creating Irish-Inspired Designs
Nail art doesn’t have to cost a lot. A few essential tools can make your manicure stand out.
- Dotting tools for creating shamrock details
- Thin striping brushes for precise lines
- Nail tape for clean geometric patterns
- Sponges for creating ombre effects
Professional vs. DIY Equipment Options
You don’t have to spend a lot on nail art supplies. While pro tools are tempting, many DIY fans get great results with affordable options.
Pro tip: A toothpick can work just as well as an expensive dotting tool for creating intricate designs!
Start with basic, affordable tools and add more as you get better. Your St. Patrick’s Day green nails will look amazing, no matter your budget.
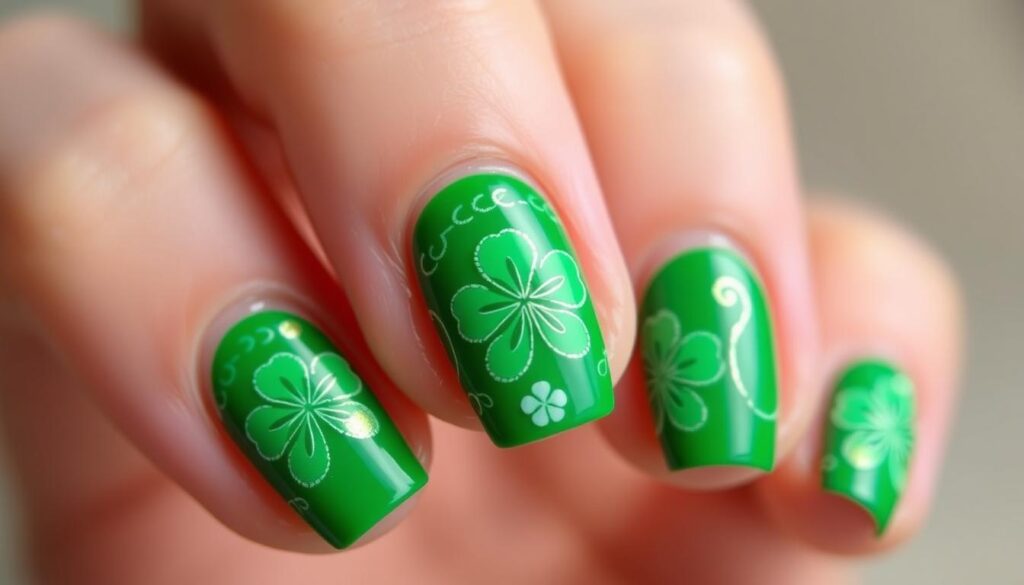
Classic Shamrock and Clover Nail Designs That Never Fail
St. Patrick’s Day nail art is all about shamrocks and clovers. These designs capture the Irish spirit and add festivity to your nails. They’re perfect for all nail art lovers, no matter your skill level.
Begin with a solid green base for your clover nail art. The right green can make your nails pop. Here are some classic shamrock nail art techniques:
- Simple three-leaf clover outline
- Detailed multi-layered shamrock designs
- Minimalist single-stroke clover accents
- Glittery gold-trimmed shamrock patterns
If you’re new to St. Patrick’s Day nail art, don’t worry. I’ve got a simple guide for you. The trick is to be patient and use thin brushes for detail.
| Design Complexity | Skill Level | Estimated Time |
|---|---|---|
| Simple Outline | Beginner | 10-15 minutes |
| Detailed Shamrock | Intermediate | 20-30 minutes |
| Intricate Clover Art | Advanced | 45-60 minutes |
My top tip is to use a dotting tool for shamrock shapes. Start with three dots in a triangle, then connect them. This works for both beginners and pros.
The charm of shamrock nail designs is in their simplicity and meaning. Whether you want a small accent or a full green look, these designs will make your St. Patrick’s Day nails unforgettable.
Glitter and Gold: Adding Sparkle to Your St. Patrick’s Day Manicure
Get ready to turn your nails into a dazzling work of art! St. Patrick’s Day is the perfect time to try glitter nails. These designs will make you shine bright, whether you’re at a parade or with friends.
Glitter can take your green nails from simple to spectacular. The right technique can make them mesmerizing, catching everyone’s eye.
Types of Glitter for Different Effects
Glitter comes in many varieties. Here are some stunning options:
- Fine Glitter: Creates a subtle, shimmering effect
- Chunky Glitter: Adds bold, dramatic texture
- Holographic Glitter: Produces a rainbow-like shine
- Metallic Glitter: Brings a luxurious gold accent
Gradient Glitter Techniques
Create a mesmerizing gradient on your nails. Start with a solid green polish. Then, layer different glitter densities for a stunning ombré effect.
Working with Metallic Accents
Gold accents can make your St. Patrick’s Day nails pop. Use thin gold striping tape or metallic polish for intricate patterns. These touches will make your manicure truly stand out.
Pro tip: Always use a good top coat to seal your glitter and prevent chipping. Your sparkling masterpiece will stay beautiful throughout the festivities!
20 St Patricks Day Nails Ideas for Every Skill Level
Creating the perfect Irish nails for St. Patrick’s Day is easy. I’ve gathered 20 st patricks day nails ideas for all skill levels. Whether you’re a beginner or an advanced nail artist, there’s something for you.
Let’s look at some spring nails designs that will make your manicure pop during the festive season:
- Beginner-Friendly Designs
- Solid emerald green polish
- Simple shamrock accent nail
- Green glitter tips
- Intermediate Level Nail Art
- Leprechaun hat design
- Gradient green ombré
- Metallic gold accent details
- Advanced Nail Techniques
- Intricate Celtic knot patterns
- 3D clover embellishments
- Detailed landscape-inspired designs
Whether you’re new to nail art or a pro, these st patricks day nails ideas will help you create a festive manicure. It will celebrate Irish spirit in style.
Celtic Knot Nail Art: Traditional Irish Patterns
St. Patrick’s Day nail art gets a creative boost with celtic knot nails. These designs bring Ireland’s rich culture to your nails. They turn your manicure into a beautiful piece of art that honors Irish traditions.
Celtic knots are an ancient art with deep meaning. Each pattern tells a story of connection and endless love. When making Irish nails inspired by these designs, focus on detail and precision.
Step-by-Step Celtic Design Tutorial
I’ll show you how to make a basic Celtic knot design for St. Patrick’s Day:
- Start with a clean, base coat of light green polish
- Use a thin nail art brush to sketch the initial knot outline
- Carefully trace intricate interlocking patterns
- Fill in the design with contrasting colors
- Seal with a top coat for durability
Traditional vs. Modern Celtic Patterns
Celtic designs vary from authentic historical patterns to modern takes. Traditional knots have tight, symmetrical lines. Modern versions often have more fluid and abstract elements.
Color Combinations for Celtic Designs
My top color choices for celtic knot nails are:
- Emerald green with gold accents
- Forest green and white
- Deep forest tones with metallic silver
“Celtic knots are more than just decorations – they’re a connection to an ancient artistic tradition.” – Irish Art Historian
Rainbow and Pot of Gold Inspired Manicures
St. Patrick’s Day nail art is a chance to get creative with bright rainbow and pot of gold designs. These festive nails turn your nails into a fun Irish luck and color celebration.
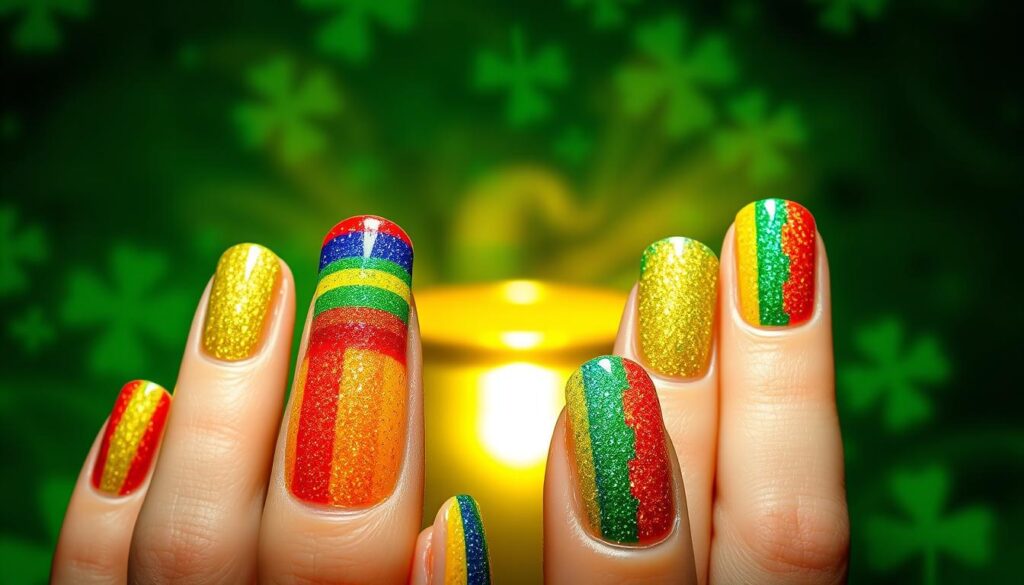
To make stunning spring nails with rainbow themes, start with a clean white base coat. This makes the colors stand out. You can create a rainbow effect in a few ways:
- Gradient blending with makeup sponges
- Thin striping brushes for precise color placement
- Watercolor nail art techniques
To get that real pot of gold look, you need metallic gold accents. Here are some ways to add gold to your St. Patrick’s Day nail art:
- Gold foil nail wraps
- Glitter ombré effects
- Delicate gold leaf detailing
| Design Technique | Difficulty Level | Time Required |
|---|---|---|
| Rainbow Gradient | Intermediate | 30-45 minutes |
| Pot of Gold Accent | Beginner | 15-20 minutes |
| Full Rainbow Nail Art | Advanced | 1-2 hours |
Pro tip: Use quick-dry top coat to seal your intricate designs and prevent chipping!
“Nail art is a form of self-expression – make your St. Patrick’s Day manicure uniquely yours!” – Professional Nail Artist
Green Ombre and Marble Effects for St. Patrick’s Day
Festive nails are a great way to celebrate St. Patrick’s Day. Green nails offer endless creative possibilities. I’ll show you two stunning nail art techniques to make your nails stand out.
Creating Perfect Ombre Gradients
Ombre nail designs add a sophisticated touch to your festive nails. To create a seamless green gradient, you’ll need a few key supplies:
- Makeup sponge
- Three shades of green nail polish
- Clear top coat
- Nail polish remover
Start by picking green shades that complement each other. I suggest choosing:
- Light mint green
- Medium emerald green
- Deep forest green
Water Marble Techniques
Water marbling turns green nails into artistic masterpieces. This technique requires patience but creates stunning results for your St. Patrick’s Day nail art.
To achieve the perfect water marble effect, you’ll need:
- Room temperature filtered water
- Multiple green nail polish shades
- Small disposable cup
- Toothpick or nail art tool
Troubleshooting Common Issues
Even professional nail artists face challenges with complex designs. Don’t get discouraged! Common problems like uneven gradients or messy marble patterns can be solved with practice and these tips:
- Always use room temperature water for marbling
- Clean up edges with a small brush
- Practice creates perfect festive nails
Quick and Easy Last-Minute St. Patrick’s Day Nail Ideas
Running short on time but still want to rock festive shamrock nail designs? Don’t worry! I’ve got some super quick and easy clover nail art tricks. They will have you looking holiday-ready in minutes.
Green nails are the ultimate St. Patrick’s Day statement. For those with limited time, here are some speedy nail art solutions. They require minimal skills:
- Shamrock Sticker Accent: Apply pre-made shamrock stickers on a solid green base
- Quick Green French Tips: Use green polish for a simple twist on classic french manicure
- Single Accent Nail: Create a clover design on one nail, keeping others solid green
I recommend having these essential supplies ready:
| Supply | Purpose |
|---|---|
| Green Nail Polish | Base color for holiday theme |
| Nail Stickers | Quick shamrock designs |
| Fine Tip Brush | Detailed clover art |
For the absolute quickest option, grab some shamrock nail stickers. Apply them over a solid green base. This trick takes less than five minutes and looks surprisingly professional!
Pro tip: Keep nail polish remover and cotton swabs nearby for quick touch-ups or corrections.
Professional Tips for Long-Lasting Holiday Nail Art
Creating stunning st patrick’s day nail art is more than just being creative. Professional nail artists have secrets to make irish nails look great and last all day. I’ll share my best tips to keep your glitter nails looking perfect from morning to night.
Nail preparation is the key to lasting designs. Start by:
- Completely cleaning and degreasing your nails
- Using a quality base coat to prevent chipping
- Applying thin, even layers of polish
- Wrapping polish tips to seal edges
For glitter nails that really sparkle, use top-notch products. Invest in a high-quality top coat specifically designed for intricate nail art. This top coat acts as a shield, keeping your st patrick’s day nail art design in place.
To keep your manicure looking fresh, carry a small touch-up kit. It should have clear top coat and a few key polish colors. Quick fixes can make your festive irish nails last longer.
Pro tip: Reapply a thin layer of top coat every two to three days to maintain shine and prevent wear.
By using these professional tips, you’ll make st patrick’s day nail art that’s not just amazing but also lasts through all the fun.
Conclusion
The world of 20 St. Patrick’s Day nails ideas is full of fun and creativity. We’ve seen everything from classic shamrocks to glitter designs. These ideas can turn your nails into a celebration of Irish spirit.
Whether you’re new to nail art or have been doing it for years, the most important thing is to have fun. Each design lets you show off your personality and join in the holiday’s excitement. Feel free to try out different techniques, colors, and patterns.
Don’t be shy to show off your nail art on social media. Tag your favorite nail artists and join the festive nail community. Nail art is a way to express yourself and celebrate in style.
Your St. Patrick’s Day nail journey is just starting. Keep looking for new ideas, keep creating, and most importantly, have fun with your nail designs!
FAQ
How long will St. Patrick’s Day nail art typically last?
Your St. Patrick’s Day nail art can last 5-7 days with the right care. Use a good base coat and apply polish in thin layers. Seal your design with a durable top coat to keep it looking fresh longer.
Do I need professional tools to create these nail designs?
No, you don’t need professional tools. Basic supplies like a dotting tool or thin brush can do the trick. I’ll share easy techniques for both beginners and experienced nail artists.
What are the best green nail polish shades for St. Patrick’s Day?
Choose from emerald, mint, sage, and forest green shades. These colors celebrate the Irish spirit and offer versatility. Essie and OPI have great green polish collections for the holiday.
How can I make my shamrock designs look more professional?
Practice makes perfect! Use a fine-tipped brush or dotting tool for clean shamrock shapes. Start with three small circles, then add a stem. Nail stencils or stamping plates can help for a crisp look.
Are glitter designs difficult to apply and remove?
Glitter can be a bit tricky. Apply it in thin layers for even coverage. Use acetone-based remover and a peel-off base coat for easy removal.
Can I create St. Patrick’s Day nail art if I’m a complete beginner?
Yes, you can! I’ve got designs for all skill levels. Start with simple designs like a shamrock on an accent nail. Don’t be afraid to try new things and have fun!
What are some alternative designs if I don’t want traditional green nails?
Try rainbow designs, gold accent nails, or Celtic patterns. You can also go for white nails with green details. Metallic accents and subtle Irish themes are great alternatives.
How can I make my nail art last longer on St. Patrick’s Day?
For lasting nail art, use a strong base coat and apply polish in thin layers. Seal with a good top coat and avoid water. Touch up chips quickly and carry a nail repair kit for fixes.